If you use the payroll module, you have the payroll tab in the employee profiles.
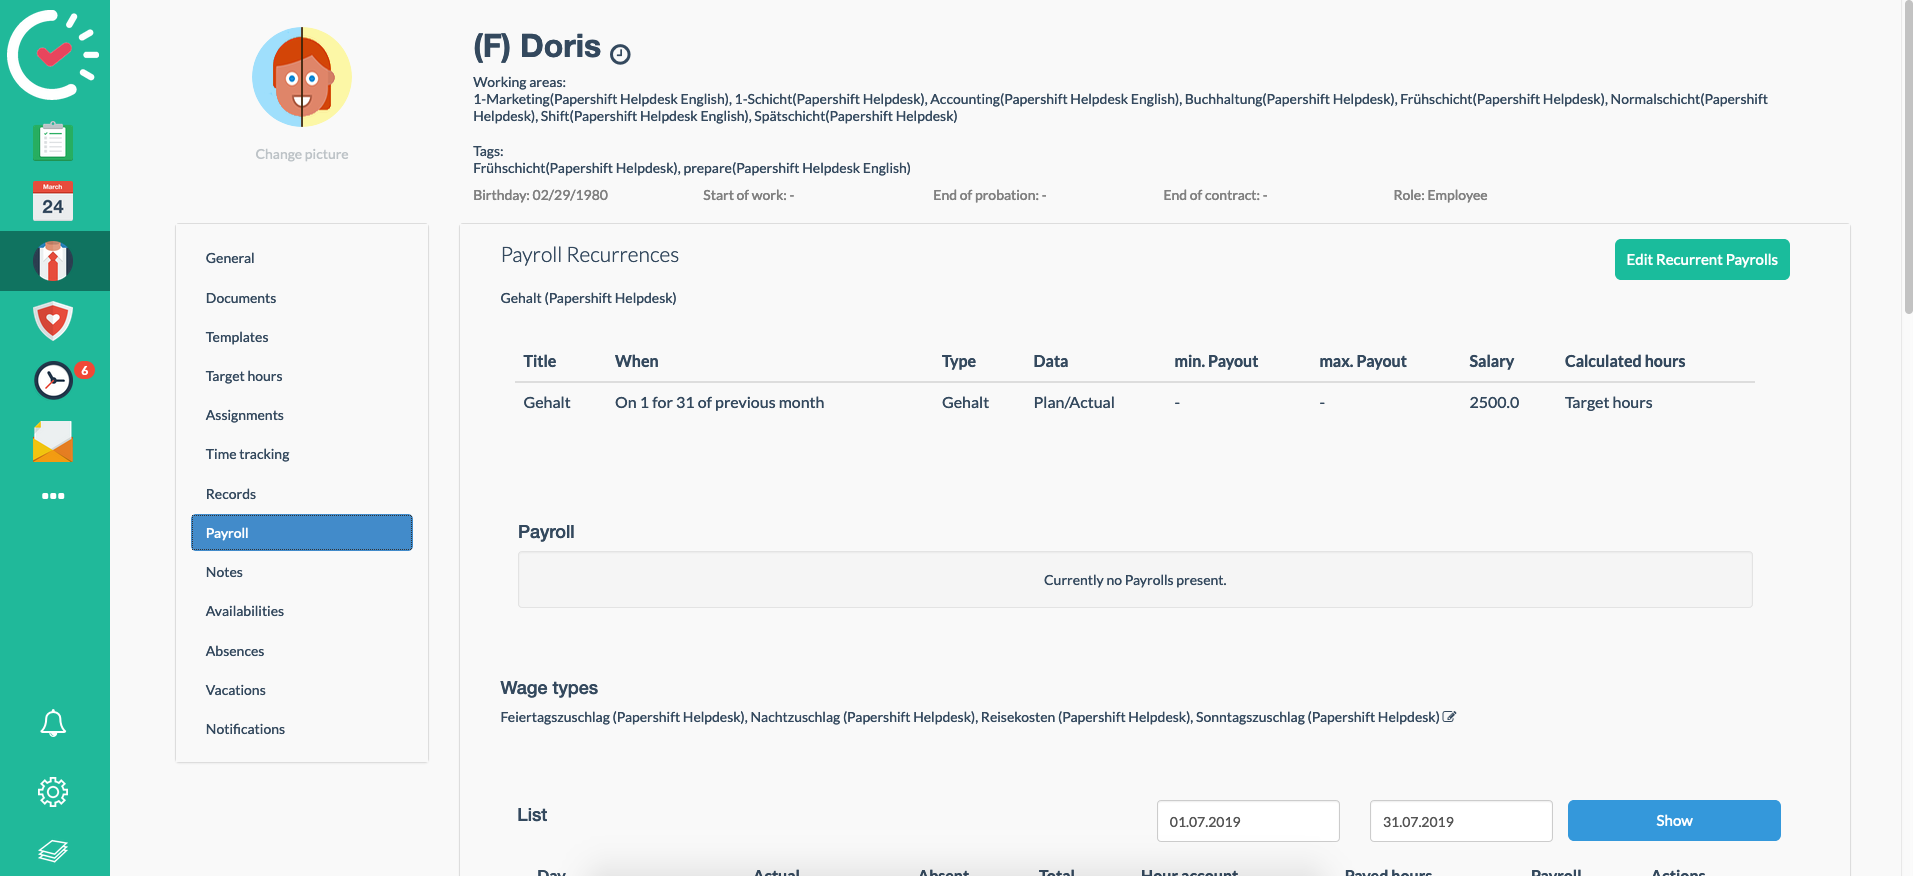
First, an automatic payroll can be created. Just click on the "Create recurring payroll" button.
There are numerous possible setting options. These differ depending on the employee and employment contract. You see two different setting options here. One for a wage earner and one for a salary earner.
Wage earner, actual hours are paid out up to a maximum of €450.
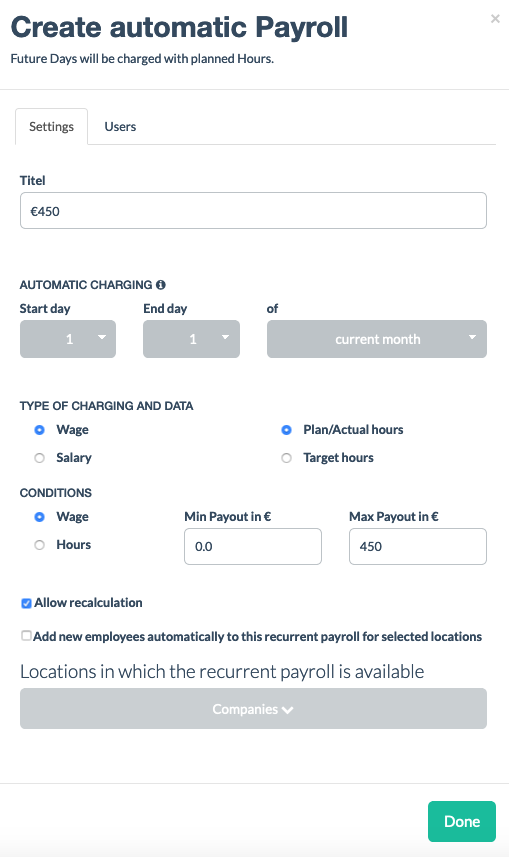
Salary earner, target hours are paid out and the employee gets a gross salary of €2000.

The cut-off date is often on the 1st of the month. The automatic payroll is made available for this day. It is created on the night from 30/31 to 1.
The 30/31 is usually set by "to"since most of the payroll time periods are from the 1st to the end of the month.
If "of the current month" is set, then the payroll takes into account the data from this month. If, for example, 31 is set and the cut-off date is the 25th, then all actual hours until the 25th are taken into account and the planned hours are calculated and paid out from the 26th to the 31st.
If "Of the previous month" is set, the payroll takes into account the data from the previous month. If, for example, 31 is set and the cut-off date is the 1st, then all actual hours until the 31st are taken into account, calculated, and paid out.
A payroll is created automatically for each month on the cut-off date. An Excel file and different DATEV-compatible files are created.
All payrolls created up to now are listed under the point payrolls.
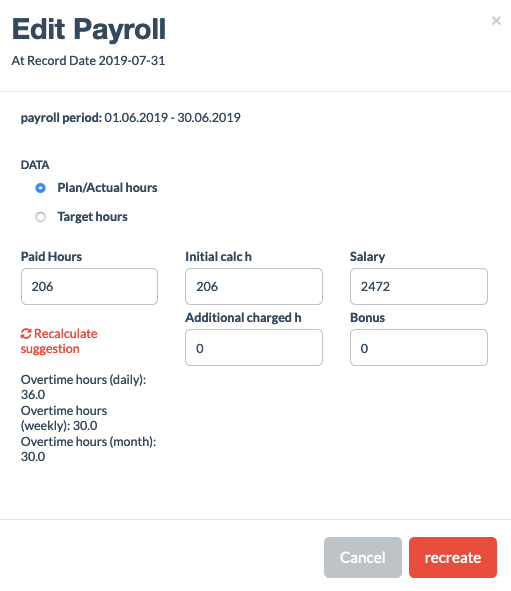
The cut-off date represents the day on which the payroll was created automatically or manually.
The payroll period is the individual payroll period.
Starting balance shows the overtime from that month which has not yet been paid out.
The hours in the payroll period are the hours worked in the month for which the payroll was created.
The paid hours represent the settled/paid out hours in this period.
In the closing balance, the overtime worked but not yet paid out becomes visible. The closing balance is usually also the starting balance of the next payroll. If changes were made to, for example, time tracking, records, or absences (confirmed or denied), which have an effect on an already created payroll, then a red triangle appears at the very front of the bar of the respective payroll.
Click on the gray download arrow next to the respective payroll, and just like that, the file can be downloaded.
The automatically or manually created files can be changed via the blue gear icon. If you click on "Recalculate proposal", the system automatically takes into account changes from time tracking, absences, or records. Pay attention to the following: If the employee is only allowed to earn a maximum of €520, then the wage, as well as the paid and booked hours, must be adjusted manually. Use the "Create new" button to have the displayed data transmitted to the duty rota.
With the red rubbish can, the last duty rota is deleted and can, if desired, be recreated manually or automatically. Only the very last duty rota can be deleted.
If there are wage types such as night surcharge, Sunday surcharge, or public surcharge, then these must be assigned to the respective employee.
Otherwise, they are not taken into account in the payroll. The wage types are often times very employee-specific.
Click on the "small pen" next to wage types and select the respective wage type.
A manual duty rota can also be created. This is very handy when changes are required on past data or the payroll is created with test data.
Possibly first delete the last incorrect payroll.
Then scroll down until you see the green € signs. Subsequently, click on the green € sign next to the respective data and enter the correct data and click "Save".
IMPORTANT: From now on, look for the "Balance" in the payroll and not in the records any more. There are cases where they match but, due to different calculations, they usually do not.